
Anybody with a child, grandchild, niece or nephew will have heard of the popular children’s book The Very Hungry Caterpillar by Eric Carle. It’s basically about an extremely peckish caterpillar who is born, eats a hella’ a lot of grub, then evolves into a beautiful elegant butterfly. It’s almost as if Disney could have written it.
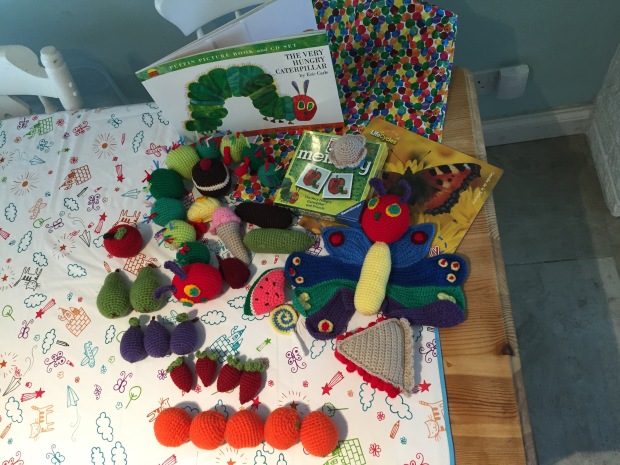
My nephew is at the age where he is leaving his easy life in nursery behind, putting on his big boy shoes and is about to step into the grueling world of Primary School. Scary, eh? My sister challenged me with producing an entire Hungry Caterpillar set to give to his nursery as a parting gift for doing such an awesome job. From the caterpillar to the butterfly…and mighty feast that comes in the middle. I was quite excited to make all of this as a set, and thought I’d share the patterns I used with you in case you want to take on the challenge yourself. Some patterns I got off the internet (mainly Ravelry) and others I just made up as I went along.
Here’s the finished product…
To create the set, you’re going to need to make:
- A hungry caterpillar
- A butterfly
- One apple
- Two pears
- Three plums
- Four strawberries
- Five oranges
- A pickle
- A salami
- A sausage
- A slice of swiss cheese
- A piece of chocolate cake
- A slice of watermelon
- A cupcake
- An ice cream cone
- A lollipop
- A slice of cherry pie
I also considered doing a leaf and a cocoon but in all honesty I ran out of time!
For all of the patterns I used a 3.5mm hook and DK yarn (even if the patterns suggested otherwise!)
I also crocheted continuously in the round (using a stitch marker) unless otherwise stated and didn’t join each row as I went around.
Any leaves used on fruit for the pattern is taken from the leaf in the Apple pattern below.
Apple

For the apple I used this Apple Place Card Pattern by Lily/Sugar’n Cream (and left out the place card!).
Pears

For the pears I used this Amigurumi Pears pattern by PlanetJune.
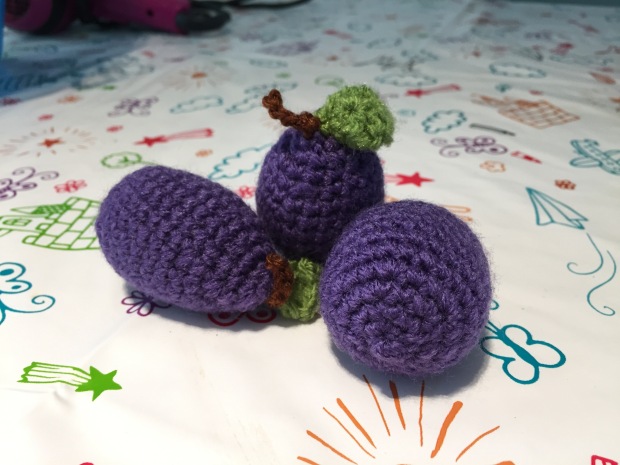
Plums
You will need:
- Purple DK yarn
- Green DK yarn
- Brown DK yarn
- 3.5mm hook
- Tapestry needle
- Stuffing
- Stitch marker
Pattern:
In purple:
1. Sc 6 into a magic ring and pull tightly to close (6 sts).
2. 2sc in each st around (12 sts).
3. *2sc in next st, sc in next st* around (18 sts).
4. *2sc in next st, sc in next 2 sts* around (24 sts).
5-10. Sc evenly around (24 sts).
11. *Decrease, sc in next 2 sts* (18 sts).
12. *Decrease, sc in next st* around (12 sts).
13. Sc evenly around.
Stuff.
14. Decrease around (6 sts).
Fasten off with a long tail, then use this tail to sew up the hole and weave in ends.
In brown:
1. Ch5.
2. Sl st into 2nd ch from hook, then sl st into remaining chains.
Fasten off and use end to sew stem to top of plum, weave in ends.
For the leaf, follow the leaf instructions in this pattern. I put a leaf on two out of the three plums to replicate how the plums looked in the book.
Strawberries

You will need:
- Red DK yarn
- Green DK yarn
- 3.5mm hook
- Stuffing
- Tapestry needle
- Stitch marker
Pattern:
In red:
1. Sc 5 into a magic ring, and pull tightly to close (5 sts).
2. 2sc in each st around (10 sts).
3. Sc evenly around (10 sts).
4. *2sc in next st, sc in next st* around (15 sts).
5. Sc evenly around (15 sts).
6. *2sc in next st, sc in next 2 sts* around (20 sts).
7-9. Sc evenly around (20 sts).
10. *Decrease, sc in next 2 sts* around (15 sts).
Stuff.
11. *Decrease, sc in next st* around (10 sts).
12. Decrease around.
Fasten off, sew up hole and weave in ends.
In green:
1. Sc 5 into magic ring, pull tightly to close and join circle with a sl st.
2. Ch 4, sc into 2nd ch from hook, hdc into next 2 chs, sl st back to next circle st.
3. Ch 3, sc into 2nd ch from hook, hdc into next ch st, sl st back to next circle st.
4. Ch 4, sc into 2nd ch from hook, hdc into next 2 ch sts, sl st back to next circle st.
5. Ch 3, sc into 2nd ch from hook, hdc into next ch st, sl st back to next circle st.
6. Ch 4, sc into 2nd ch from hook, hdc into next 2 ch sts, sl st back to next circle st.
Fasten off and use end to sew to top of strawberry and weave in ends.
Oranges

You will need:
- Orange DK yarn
- Green DK yarn
- 3.5mm hook
- Stitch marker
- Stuffing
- Tapestry needle
Pattern:
In orange:
1. Sc 6 into magic ring, pull tightly to close hole (6 sts).
2. 2sc in each st around (12 sts).
3. *2sc in next st, sc in next st* around (18 sts).
4. *2 sc in next st, sc in next 2 sts* around (24 sts).
5. Sc evenly around (24 sts).
6. *2sc in next st, sc in next 3 sts* around (30 sts).
7. *2sc in next st, sc in next 4 sts* around (36 sts).
8-10. Sc evenly around (36 sts).
11. *Decrease in next st, sc in next 4 sts* around (30 sts).
12. *Decrease in next sc, sc in next 3 sts* around (24 sts).
13. Sc evenly around (24 sts).
Stuff.
14. *Decrease in next st, sc in next 2 sts* around (18 sts).
15. *Decrease in next st, sc in next st* around (12 sts).
Stuff rest of orange.
16. Decrease around, sl to first decrease and fasten off.
Sew up hole and weave in end.
Use a small amount of green yarn to create the nobbly bits on the top and bottom of the orange. It looks good if you no a small dot on the top and a sort of star on the bottom.
Ice cream cone


I used this ice cream cone pattern by Melia K which was super easy to throw together with a fantastic end effect!
Cherry Pie


When I found the pattern for the cherry pie I was super excited as it looked so effective and I love the way the cherries look like they’re seeping out of the pie. The pattern I used is found here on this forum, or on Sherry Rohekar’s Ravelry page. Thanks Sherry!
Swiss Cheese


If I’m completely honest I wasn’t completely satisfied with the way the cheese came out. That’s probably because I was making up the pattern and couldn’t quite get the right shape!
You will need:
- Light yellow DK yarn
- Yellow DK yarn
- 3.5mm hook
- Stitch marker
- Stuffing
- Tapestry needle
Pattern:
Top and bottom: Make 2
In light yellow:
1..Ch2.
2. Sc2 into 2nd ch from hook (2 sts) ch1.
3. Sc 2 into each st across (4 stitches) ch1.
4. Sc in each st across (4 stitches) ch1.
5. Sc 2 in first st, sc in each st across until last st, sc 2 into last st (6 stitches) ch1.
6. Sc in each st across (6 stitches) ch1.
7. Sc 2 in first st, sc in each st across until last st, sc 2 into last st (8 stitches) ch1.
8. Sc in each st across (8 stitches) ch1.
9. Sc 2 in first st, sc in each st across until last st, sc 2 into last st (10 stitches) ch1.
10. Sc in each st across (10 stitches) ch1.
11. Sc 2 in first st, sc in each st across until last st, sc 2 into last st (12 stitches) ch1.
12. Sc in each st across (12 stitches) ch1.
Sides:
Attach yellow yarn to corner of one of the triangles and sc around. There should be 12 sc on each side (36 stitches)
Sc around for 3 rounds (36 stitches)
Sc around one more time but this time attach the other triangle as you go by sc into the two loops on the side stitch and the 2 loops on the triangle stitch at once. Remember to stuff the cheese before you reach the end of the round.
Spots
Small spot:
In yellow:
1..Make magic ring, ch1.
2. Sc 4 into magic ring (5 stitches).
3. Join to first sc and fasten off leaving long tail for sewing.
Large spot:
In yellow:
1..Make magic ring, ch1.
2. Sc 4 into magic ring (5 stitches).
3. Sc 2 in each st around (10 stitches).
4. Join to first sc and fasten off leaving long tail for sewing.
Sew these to the cheese wherever you desire.
Sausage


You will need:
- Brown DK yarn
- 3.5mm hook
- Stitch marker
- Stuffing
- Tapestry needle
Pattern:
1. Make magic ring, ch1.
2. Make 6 sc in magic ring (6 stitches).
3. 2 sc in each st around (12 stitches).
4. *2 sc in first st, sc in next st* around (18 stitches).
5. *2sc in next st, sc in next 2 sts* around (24 stitches).
6-16. Sc around for 11 rounds.
17. Dec 3, sc around.
18. Dec 1, sc around.
19. Sc 2 in next st, sc around.
20. Sc 2 in next 3 sts, sc around.
21. Sc around for 3 rounds.
Stuff.
22. *Dec in next st, sc in next 2 sts* around.
23. Dec in next st, sc in next st) around.
24. Dec around, join to first st and fasten off. Use end to sew up hole and weave in end.
Lollipop


I used this lollipop brooch pattern by Twinkie Chan but left off the cute little bow. I was looking forward to doing the lollipop the least because I thought the swirl pattern would be difficult to do, but it turned out to be really simple and I’ll definitely be trying it again.
Watermelon

The watermelon pattern is available to download for free from Dena Ziegler’s Ravelry page.
Cake


You will need:
- Light brown DK yarn
- Medium brown DK yarn
- Dark brown DK yarn
- Cream DK yarn
- Red DK yarn
- 3.5mm hook
- Stitch marker
- Stuffing
- Tapestry needle
Pattern:
In medium brown:
Work in back loops only.
1. Ch2, 4sc in second ch from hook, place marker.
2. 3sc in each st around (12 sts).
3. Sc in next st, *3sc in next st, sc in next 2 sts* 3 times, 3sc in next st, sc in next st (20 sts).
4. Sc in next 2 sts, *3sc in next st, sc in next 4 sts* 3 times, 3sc in next st, sc in next 2 sts (28 sts).
5. Sc in next 3 sts, *3sc in next st, sc in next 6 sts* 3 times, 3 sc in next st, sc in next 3 sts (36 sts).
6. Sc in next 4 sts, *3sc in next st, sc in next 8 sts* 3 times, 3sc in next st, sc in next 4 sts (44 sts).
Now work in both loops.
7-9. Sc evenly around (44 sts).
Fasten off and change to dark brown yarn.
10-13. Sc evenly around (44 sts).
Fasten off and change to cream yarn.
14-15. Sc evenly around (44 sts).
Fasten off and change to dark brown yarn.
16. Sc evenly around (44 sts).
17. Sc in next 4 sts, *decrease by inserting hook into next 3 sts, yo, pull through all 4 loops on hook, sc in next 8 sc* 3 times, decrease by inserting hook into next 3 sts, yo, pull through all 4 loops on hook, sc in next 4 sts (36 sts).
18. Sc in next 3 sts, *decrease by inserting hook into next 3 sts, yo, pull through all 4 loops on hook, sc in next 6 sts* 3 times, decrease by inserting hook into next 3 sts, yo, pull through all 4 loops on hook, sc in next 3 sts (28 sts).
Note: Stuff cube whilst decreasing.
19. Sc in next 2 sts, *decrease by inserting hook into next 3 sts, yo, pull through all 4 loops on hook, sc in next 4 sts* 3 times, decrease by inserting hook into next 3 sts, yo, pull through all 4 loops on hook, sc in next 2 sts (20 sts).
20. Sc in next st, *decrease by inserting hook into next 3 sts, yo, pull through all 4 loops on hook, sc in next 2 sts* 3 times, decrease by inserting hook into next 3 sts, yo, pull through all 4 loops on hook, sc in next st (12 sts).
21. *Decrease by inserting hook into next 3 sts, yo, pull through all 4 loops on hook* 4 times (4 sts).
Fasten off, sew up hole and weave in end.
Cherry:
In red:
1. SC6 into a magic ring (6sts).
2. 2sc in each st around (12 sts).
3. Sc evenly around (12 sts).
4. Decrease around (6 sts).
Stuff, fasten off with long tail and use this to sew to top of cake.
Cupcake


I used this quick cupcake pattern by Hannah Kaminsky. I liked this because it’s crocheted in the same style as the ice cream so you get a similar look that looks great in the set.
Pickle


You will need:
- Green DK yarn
- 3.5mm hook
- Stitch marker
- Stuffing
- Tapestry needle
Pattern:
1. Make a slip knot, ch2.
2. 6sc into 2nd ch from hook (6 sts).
3. 2sc in each st around (12 sts).
4. Sc evenly around (12 sts).
5. *2sc in next st, sc in next st* around (18 sts).
6. *2sc in next st, sc in next 2 sts* around (24 sts).
7. *2sc in next st, sc in next 3 sts* around (30 sts).
9-22. Sc evenly around (30 sts).
23. Decrease twice then sc evenly around (28 sts).
24. 2sc in next 2 sts, then sc evenly around (30 sts).
25-28. Sc evenly around (30 sts).
Stuff.
29. *Decrease in next st, sc in next 3 sts* around (24 sts).
30. *Decrease in next st, sc in next 2 sts* around (18 sts).
31. *Decrease in next st, sc in next st* around (12 sts).
Finish stuffing.
32. Decrease evenly around (6 sts).
Fasten off, sew up hole and weave in end. To make it look more pickle-y I used extra green yarn to sew on random “knobbly bits” in random places.
Salami


Remember that the salami in the book isn’t the full thing, it’s a cut off segment, which is why the salami for this set is so small!
You will need:
- Dark red/brown DK yarn
- 3.5mm hook
- Stitch marker
- Stuffing
- Tapestry needle
Pattern:
1..Ch5.
2. 6sc in 2nd ch from hook, sl st to first st to join (6 sts).
The remaining chains from the first round is the bit that sticks out of the end of the salami. You may need to use the tapestry needle to push it through so it sticks out of RS of work.
3. 2sc evenly around (12 sts).
4. *2sc in next st, sc in next st* around (18 sts).
5. *2sc in next st, sc in next 2 sts* around (24 sts).
6-13. Sc evenly around (24 sts).
14. In BLO, *sc in next 2 sts, decrease* around (18 sts).
Stuff.
15. In both loops, *sc in next st, decrease* around (12 sts).
16. Decrease around (6 sts).
Fasten off and use tail to sew up hole. Weave in end.
The Caterpillar


This super cute Hungry Caterpillar pattern is available as a free download on Britteny’s Boutique’s Ravelry page. This pattern is easy to follow and you can alter the different shades of green you use to get the desired look that you want!
I didn’t do the eyes in felt like in the pattern, if you want crocheted eyes like the ones on mine, follow this simple pattern:
Make 2
In yellow:
1. Ch3.
2. Sc in 2nd ch from hook.
3. 3sc in last ch.
4. Sc in 2nd ch (on other side).
5. 3sc back in first ch.
You should now have a small oval.
6. Sc around the oval again, doing 3sc in each end of the oval to keep the shape.
In green:
1. Ch3.
2. Sc in 2nd ch from hook.
3. 3sc in last ch.
4. Sc in 2nd ch (on other side).
5. 3sc back in first ch.
You should now have a small oval. Sew this to yellow oval to create the eye, then sew to head.
The Butterfly

You will need:
- Red DK yarn
- Light yellow DK yarn
- Yellow DK yarn (for eyes)
- Green DK yarn
- Darker green DK yarn (for eyes)
- Blue DK yarn
- Dark blue DK yarn
- Purple DK yarn
- Dark red DK yarn
- 3.5mm hook
- Stitch marker
- Stuffing
- Tapestry needle
Pattern:
Firstly, make the head in the same way as the head in the Hungry Caterpillar pattern from earlier, just so that they look alike!
The body:
In light yellow:
1..Make a magic ring, ch1 and 7sc into ring (7sts).
2. 2sc evenly around (14 ts).
3. *sc in next st, 2sc in next st* around (21 sts).
4. *2sc in next st, sc in next 2 sts* around (28 sts).
5-22. Sc evenly around (28 sts).
23. *Sc in next 2 sts, decrease* around (21 sts).
24-26. Sc evenly around (21 sts).
27. *Decrease, sc in next st* around (14 sts).
28. Sc evenly around (14 sts).
Fasten off leaving a long tail. Stuff the body and use the tail to sew to bottom of head.
Top wings:
Make 2
In blue:
1. Ch19.
2. Sc in 2nd ch from hook, sc in next 3 chs, hdc in next 4 chs, dc in next ch, hdc in next 4 chs, sc in next 4 chs, 3sc in last ch.
Now work down other side of chain.
3. Sc in next 4 chs, hdc in next 4 chs, dc in next ch, hdc in next 4 chs, sc in next 4 chs, 3 sc in last ch.
Continue to work around.
4. Sc in next 4 sts, hdc in next 4 sts, 3dc in next st, hdc in next 4 sts, sc in next 5 sts, 3sc in next st.
5. Sc in next 5 sts, hdc in next 4 sts, 3dc in next st, hdc in next 4 sts, sc in next 5 sts, 3sc in next st.
6. Sc in next 5 sts, hdc in next 5 sts, 3dc in next st, hdc in next 5 sts, sc in next 6 sts, 3sc in next st.
7. Sc in next 6 sts, hdc in next 5 sts, 3dc in next st, hdc in next 5 sts, sc in next 6 sts, 3sc in next st.
8. Sc in next 6 sts, hdc in next 6 sts, 3dc in next st, hdc in next 6 sts, sc in next 7 sts, 3sc in next st.
9. Sc in next 7 sts, hdc in next 6 sts, 3dc in next st, hdc in next 6 sts, sc in next 5 sts, sl st in next st.
Fasten off with long tail for sewing to body.
For the decoration:
In red:
1. Make magic ring, ch1, sc5 into magic ring and pull tight.
2. Sc evenly around.
Change to dark red.
3. *Sc in next st, 2sc in next st* around.
Fasten off and use tail to sew to end of blue wing (below).

The rest of the wings are made using the same pattern, but in different colours. You can do the top wings like this too if you want them all to match.
You will need 2 of each colour in dark blue, green and purple. Each wing colour has its own unique decoration to add, I’ll explain these below the wing pattern.
1. Ch25.
2. Sc in next 10 sts, hdc in next 10 sts, dc in next 3 sts, 5dc in last st.
Now work down other side of chain.
3. Dc in next 3 sts, hdc in next 10 sts, sc in next 10 sts, 3sc in last st.
Continue round the wing.
4. Sc in next 10 sts, hdc in next 11 sts, dc in next 2 sts, 3dc in next 3 sts, dc in next 3 sts, hdc in next 11 sts, sc in next 11 sts, 2sc in next 2 sts.
5. Sc in next 10 sts, hdc in next 10 sts, dc in next 6 sts, 3dc in next st, 2dc in next st, dc in next 3 sts, 2dc in next st, 3dc in next st, dc in next 6 sts, hdc in next 10 sts, sc in next 11 sts, sl st into next st.
Fasten off leaving long tail to sew to body.
The decorations:
Make 2 of each (one for each wing).
For the dark blue wings:
Using light yellow:
1. Make a magic ring, ch1, sc5 in magic ring and pull tightly.
2. Close circle with a sl st to first st.
Make 6 of these altogether and sew 3 to the end of each dark blue wing. Then use red yarn to sew a small circle in the middle of each circle (below).

For the green wings:
In light yellow:
1. Ch8.
2. 5hdc into 2nd ch from hook, sl st into next st.
3. *5hdc into next st, sl st into next st* twice.
Fasten off and sew each one to the end of the green wings (below).

For the purple wings:
In red:
1. Ch8.
Change to yellow.
2. In BLO, 2sc in each st around, sl st to first st.
Fasten off and use tail to sew to ends of purple wings (below).

Now you should have all of the wings done, it’s time to sew them on to the body! You can sew these directly to the back of the body if you wish, but I actually sewed each wing segment together before doing so. So, starting at the top, you would sew the blue wing to the dark blue wing, then sew this to the green wing, then sew this to the purple wing. I found this made it easier to attach to the body and held together much better on the finished butterfly. I used the long tail ends to sew each one together, and had one left over to sew to the body, it looks like this on the back of the butterfly:

And that’s it! The set is complete! My sister got a bag to put it all in from eBay and added The Very Hungry Caterpillar book and a couple of other nature books and games and gave them to the nursery to use for learning in the future!
I hope these patterns make sense, it’s my first time writing up patterns so if anything doesn’t make sense please let me know so I can clarify.
Let me know if you make a set, I’d love to see some pictures, and hopefully they’ll go down well with your little loved ones! I think the caterpillar at least got a good reception from Noah!

